
Every Holiday with Evelyn Guide
Paint Brush Guide
Which brush should you use for coats, faces, trim, molded edges and tiny details? Because painting an entire six-foot nutcracker with one tiny round brush is a personal choice... but it is not a choice I support. 😂🎨
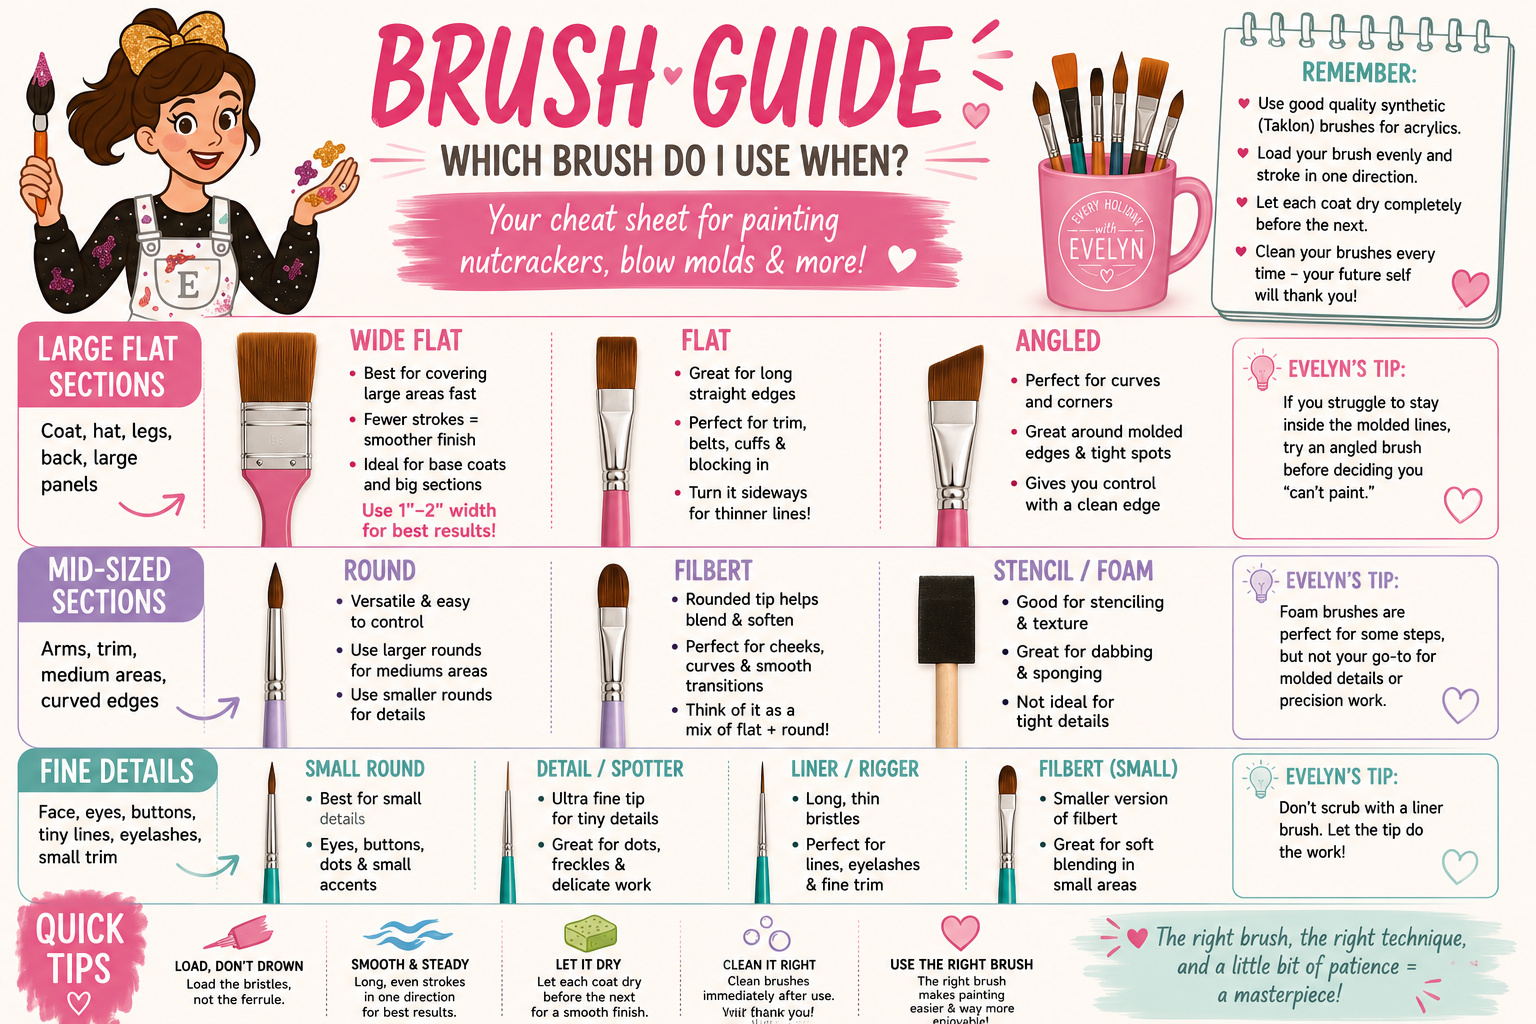
Just Tell Me Which Brush to Grab 😂
Here is the no-brush-degree-required version. Start with the size of the area you're painting, then pick the shape that gives you the control you need.
Start Here
For acrylic paint, I would start with synthetic or Taklon brushes.
They're a practical choice for acrylic craft painting because they give you control, hold up well to regular cleaning and come in the flat, angled, round, filbert and detail shapes that are useful for nutcrackers and blow molds.
What Each Brush Is Actually Good For
The right brush will not magically paint the nutcracker for you. Unfortunately. 😂 But it can make the job much easier to control.
🖌️ Wide Flat Brushes
Best for: coats, hats, legs, backs, large panels and base colors.
More brush width means you can cover a large area with fewer passes. That's a huge help on giant pieces where hundreds of tiny overlapping strokes can make the finish harder to keep even.
For the large nutcrackers and blow molds we paint, I like the idea of having a dedicated 1–2 inch wide synthetic brush for the biggest sections.
▰ Flat Brushes
Best for: medium-to-large sections, belts, cuffs, straight trim and blocking in color.
The straight brush edge is helpful when you're working beside molded lines or creating a cleaner edge.
Flat brushes are also more versatile than people realize. Turn one sideways and use the narrow edge for a thinner stroke.
📐 Angled Brushes
Best for: curved trim, collars, cuffs, hat details and raised molded edges.
The pointed side of an angled brush gives you a lead edge to follow while the wider part of the brush carries paint.
🟠 Round Brushes
Best for: faces, buttons, controlled medium areas and details.
The pointed tip gives you control while the fuller body of the brush can still hold paint.
Think of it this way: larger round brushes can handle medium sections. Smaller rounds are for details.
🌷 Filbert Brushes
Best for: cheeks, curves, soft edges and blending.
A filbert is flatter through the body but has a rounded tip. That rounded shape is useful when you don't want the hard, squared edge a flat brush can leave.
✏️ Detail, Liner & Rigger Brushes
Best for: eyelashes, thin outlines, tiny trim, mouth details and other “please don't breathe” areas. 😂
A tiny detail round or spotter is useful for very small controlled marks, dots and delicate details.
A liner or rigger has longer, thinner bristles and is useful for longer fine lines.
🧽 Foam & Stencil Brushes
Best for: stenciling, dabbing, sponging, texture and some broad simple applications.
Foam brushes can be useful little project tools, but they would not be my first pick for detailed molded areas, tight curves or precision edge work.
Use them where the technique makes sense—not because they were the first thing you found in the junk drawer. 😂
Why Does My Paint Look So Streaky?
Before you blame the paint, let's talk about the poor brush you're making do all the work. 😂
Your Brush May Be Too Small
A tiny brush forces you to make more passes across a large area. On a coat, leg or large panel, try a wider brush that matches the size of the section.
The Bristles May Be Fighting You
Splayed, uneven or inconsistent bristles can leave inconsistent marks behind. A fancy brush is not required, but the bristles should stay together and give you reasonable control.
You May Be Overworking the Paint
Acrylic paint can begin drying quickly. Repeatedly brushing back through paint that's already starting to set can disturb the finish. Work in controlled sections and let each coat dry before piling on another.
You're Trying to Get Full Coverage in One Coat
Don't make the first coat carry the emotional burden of being the final coat. 😂 Several controlled coats may give you a cleaner result than one thick, overloaded layer.
You're Pressing Too Hard
You don't need to flatten the brush against the nutcracker. If the bristles are bent sideways and begging for help, lighten your pressure. 😂
How Much Paint Should Be on the Brush?
Enough to paint. Not enough to baptize the ferrule. 😂
Pick up paint with the working portion of the brush instead of shoving paint all the way into the metal ferrule.
Work the paint into the usable bristles so one giant blob is not sitting on the very end of the brush.
You want the brush loaded, not dripping. Then use smooth, controlled strokes and reload as needed.
Don't Want a Brush Degree? 😂
You do not need 84 brushes. Here are brush sets and tools worth looking at for this type of project—including one set that comes up repeatedly with members of our community.
Royal & Langnickel 25pc Taklon Set
A larger mixed Taklon set with assorted brush shapes and sizes. This is the kind of set I'd look at if you're starting from scratch and want variety without buying every brush individually.
Shop the 25pc Taklon SetA Set Our Community Keeps Liking
Lots of members in our nutcracker and blow mold communities have used and liked this brush set for their projects. I haven't crowned my own forever favorite set yet 😂, but when people actually painting these giant plastic friends keep liking something, I pay attention.
Shop the Group Member FavoriteArtist's Loft 2" Wide Synthetic Mottler Brush
This fills the biggest hole in a normal craft brush set: a genuinely wide synthetic brush for coats, hats, backs, large panels, JOY letters and other giant sections. My simple recommendation? Buy one variety set and one big brush. Done. 😂
Shop the 2" Wide BrushHello Hobby 15pc White Taklon Set
A mixed White Taklon craft brush set with several smaller brush shapes and sizes. Worth looking at if you want variety for medium sections and detail work.
Shop the Hello Hobby SetCraft Smart Golden Taklon 15pc Set
A Golden Taklon variety set from Michaels. This is one I'd look at if you're already shopping Michaels for acrylic paints and want a mixed craft brush set in the same trip.
Shop the Craft Smart SetRoyal & Langnickel Soft-Grip White Taklon Set
A smaller White Taklon set with soft-grip handles. This is the option I'd look at if you care more about a smaller group of comfortable brushes than getting the biggest variety pack possible.
Shop the Soft-Grip SetArtist's Loft Taklon Synthetic 10pc Set
Another Taklon option from Michaels for acrylic and water-based painting. I'm including it as an alternate—not because you need to collect every set on this page. 😂
Shop the Artist's Loft Set#affiliatelinks · I may earn a commission from qualifying purchases at no additional cost to you. Brush recommendations are based on brush type, shape, intended use and community feedback where noted; I have not personally tested every set listed.
Please Clean the Poor Brush 😂
Acrylic paint dries quickly. The easiest brush to rescue is the one you didn't let turn into a tiny acrylic-covered weapon in the first place.
Remove Excess Paint
Get the extra paint out of the brush before you begin washing it.
Rinse Thoroughly
Rinse water-based acrylic paint from the bristles before it has a chance to fully dry.
Use Mild Soap or Brush Cleaner
Gently clean the bristles and continue rinsing until the brush is clean.
Reshape the Bristles
Gently bring the brush back to its natural shape instead of letting it dry looking like it just survived a tornado.
Let It Dry Properly
Don't store the brush sitting bristle-down in a cup of water. Your cloudy paint-water cup is not a long-term brush storage system. 😂
Did You Already Murder the Brush? 😂
For brushes that need more than a quick rinse, The Masters Brush Cleaner & Preserver is a dedicated artist brush-cleaning product worth looking at. Fresh acrylic should still be cleaned as soon as possible—this is your brush-care and rescue option, not permission to leave a paintbrush on the counter for three business days. 😂
Shop The Masters Brush CleanerStill Holding a Brush and Questioning Every Life Choice? 😂
Come ask us. Our nutcracker and blow mold communities are full of people painting coats, faces, glitter stripes and tiny eyelashes on giant plastic holiday decor—and somebody has probably already fought with the exact section you're staring at.