Every Holiday with Evelyn Guide

Nutcracker Blush Guide

Five easy ways to give those giant plastic cheeks a little lifeβ€”without accidentally giving your nutcracker full 2016 contour. πŸ˜‚πŸŒΈ

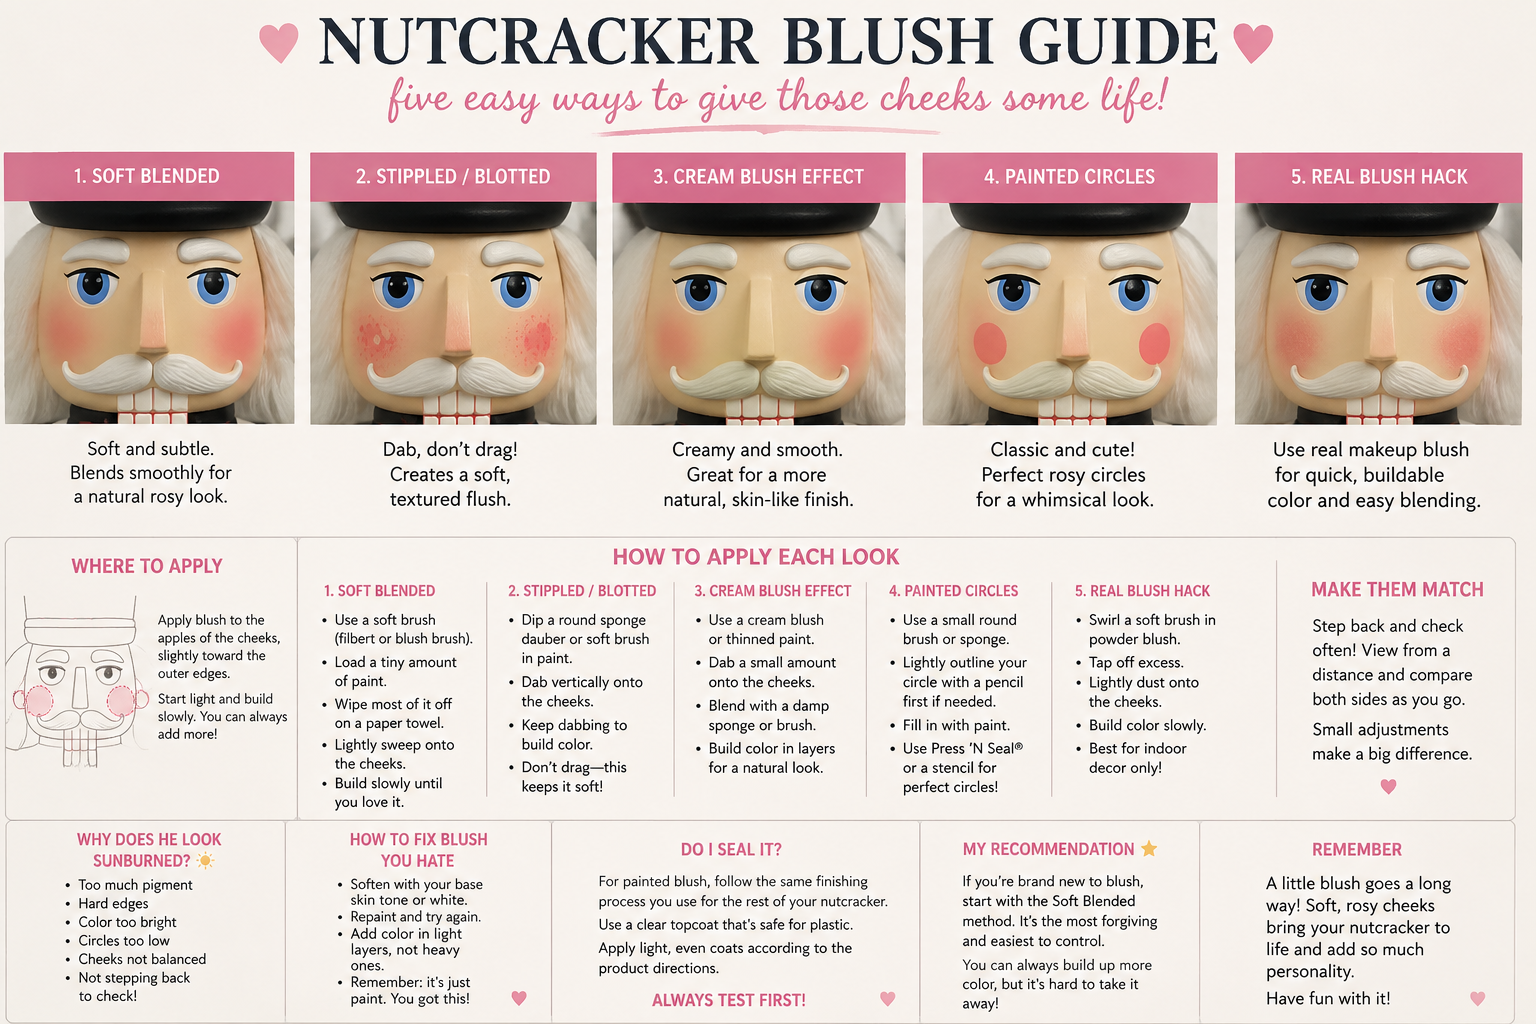
Nutcracker blush guide showing five different ways to add rosy cheeks

Which Blush Look Do I Want?

Before you grab the pink paint, decide whether you're going for soft and natural or intentionally cute and graphic.

🌸 Soft Blended

Natural-looking rosy cheeks with soft edges.

🎨 Stippled / Blotted

A soft, broken texture created with light dabbing.

πŸ’• Cream Blush Effect

Smooth, blended color with a softer skin-like finish.

β­• Painted Circles

Classic, whimsical and intentionally graphic.

πŸ’„ Real Blush Hack

A fun indoor-decor trick using powder cosmetic blush.

Before You Start

Where should the blush actually go?

Start around the fuller part or β€œapple” of each cheek and build the color slightly outward. Exact placement will depend on the molded face, but the biggest rule is to start lightly and step back often.

πŸ“Œ Evelyn's Tip: Stand several feet away and look at the whole face. What looks like β€œbarely any blush” when your nose is six inches from the nutcracker can suddenly look like he spent nine hours at the beach when you step back. πŸ˜‚β˜€οΈ

Five Ways to Add Blush

There isn't one β€œcorrect” cheek. Pick the finish that matches the personality of your nutcracker.

My Beginner Pick

🌸 1. Soft Blended Blush

Best for: a soft, subtle and more natural rosy-cheek look.

  • Use a soft brush, such as a soft filbert or round brush.
  • Pick up a very small amount of paint.
  • Remove most of the excess before touching the face.
  • Lightly build the color over the cheek area.
  • Keep the outer edges soft and build the color gradually.
The secret is not magical blending skills. It is using dramatically less pink than your heart tells you to. πŸ˜‚
Soft Texture

🎨 2. Stippled or Blotted Blush

Best for: rosy color with a soft, broken or slightly textured finish.

  • Use a small round sponge, dauber or soft brush.
  • Load a very small amount of paint and remove the excess.
  • Tap the color vertically onto the cheek.
  • Keep dabbing to build the color slowly.
  • Soften the outer edges with lighter dabbing.
Dab. Don't drag. If you start sweeping the paint around, you've basically left the stippling method and gone rogue. πŸ˜‚
Smooth & Rosy

πŸ’• 3. Cream Blush Effect

Best for: a smooth, creamy-looking blush with soft transitions.

This is less about using literal cosmetic cream blush and more about recreating that softly blended appearance with your paint.

  • Use a small amount of pink or rose paint.
  • Work with a soft brush or sponge.
  • Apply a small amount to the center of the cheek area.
  • Blend the color outward while keeping the edges soft.
  • Build the color in light layers instead of one heavy application.
You're looking for a soft transitionβ€”not a pink island floating in the middle of his face. πŸ˜‚
Classic & Whimsical

β­• 4. Painted Rosy Circles

Best for: traditional, whimsical or intentionally graphic nutcracker designs.

  • Decide on the circle size before painting.
  • Lightly mark the center point on each cheek if needed.
  • Use a small round brush, sponge or reusable circle template.
  • Fill the circle with thin, controlled coats.
  • Step back and compare both cheeks before making either circle larger.
Need matching circles? This is exactly the kind of tiny shape where the Press 'N Seal template trick can save your sanity.
Community Hack Β· Indoor Decor

πŸ’„ 5. Real Makeup Blush

Best for: indoor decorative pieces when you want quick, buildable rosy color.

Yes. Actual powder blush. πŸ˜‚ This is one of those delightfully random tricks that has been used by painters in our community.

  • Use a clean, soft brush.
  • Swirl the brush lightly in powder blush.
  • Tap off the excess before touching the nutcracker.
  • Lightly dust the cheeks and build the color slowly.
  • Test the product on your exact surface before committing.
My lane for this hack is indoor decorative use. For outdoor projects, I would rather create the blush with paint and finish the piece using products appropriate for the display conditions.

How Do I Make Both Cheeks Match?

Your face is probably not perfectly symmetrical either, but apparently we demand more from a $40 plastic nutcracker. πŸ˜‚

1 Mark the Centers

Lightly identify the center of each cheek area before you start building color.

2 Build Both Together

Add a little color to one cheek, then move to the other. Don't fully finish one side before starting the second.

3 Step Back Often

View the face from several feet away. Compare height, size and color intensity before adding more.

Why Does He Look Sunburned? πŸ˜‚β˜€οΈ

If your nutcracker suddenly looks like he just got back from spring break, one of these is usually the culprit.

Too Much Pigment

Blush is much easier to build than remove. Start with less paint or powder and slowly increase the color.

The Edges Are Too Hard

Unless you're intentionally painting circles, soften the outer edge of the blush so the transition into the base color is more gradual.

The Color Is Too Bright

A screaming neon pink may not create the soft rosy effect you had in your head. Try a softer pink, dusty rose or a small amount of a muted tone.

The Blush Is Too Low

When blush drifts too far down the face, it can visually pull the cheeks downward. Step back and check the placement against the eyes, nose and fuller cheek area.

You Never Stepped Back

This one is personal. πŸ˜‚ If you're staring at one cheek from six inches away for twenty minutes, you are no longer a reliable witness. Step back.

πŸ’• Okay, I Hate the Blush. Now What?

Breathe. It's paint. We are not performing facial reconstruction on an actual human being. πŸ˜‚

If the blush is still workable, gently soften the area using the appropriate technique for the paint you're using.

If it has dried and you genuinely hate it, use your base face color to carefully soften or cover the area, allow that layer to dry, and try again.

Do not keep adding more pink because you're hoping the blush will emotionally resolve itself. It will not. πŸ˜‚

Do I Seal the Blush?

It depends on the blush method and how the finished piece will be used.

🎨 Painted Blush

Treat painted blush as part of the rest of your painted project. Follow the finishing system you've chosen for the piece and use products that are compatible with the surface and display conditions.

πŸ’„ Real Blush Hack

Powder makeup is the experimental community-hack option here. Test the exact combination before adding any clear finish because a topcoat may change the color or appearance. I would keep this method in the indoor decorative lane.

My Beginner Recommendation

Start with soft blended blush. 🌸

If you've never painted cheeks before, this is the method I'd start with. Use a tiny amount of color, keep the edges soft and slowly build until you like it. You can always add more blush. Taking it away is where the emotional journey begins. πŸ˜‚

Did He Get Rosy Cheeks or a Full Face of Glam? πŸ˜‚

Come show us. Our nutcracker and blow mold communities are full of painted faces, rosy cheeks, tiny eyelashes and people who will fully understand why you have spent forty-five minutes comparing two nearly identical shades of pink.