
Every Holiday with Evelyn Guide
Rub 'n Buff Guide
How to add metallic highlights, dimension and an aged finish to nutcrackers and blow molds—without making the entire thing look like it fell into a bucket of gold paint. 😂✨
First Things First
What even is Rub 'n Buff? 😂
Rub 'n Buff is a wax-based metallic finish. It is not regular acrylic paint. You use a very small amount, work it onto the surface and buff the finish to bring out more metallic shine. That's what makes it so good for raised details, edges and little places where you want dimension instead of one flat metallic color.
Where Should I Use It?
Look for the places that would naturally catch light or where you want molded details to stand out.
Great for making raised buttons and molded hardware look more dimensional.
Add a metallic accent to the center or raised portions of a bow.
Use lightly along raised seams, collars and molded jacket details.
Highlight raised trim without painting the entire hat metallic.
A little metallic finish can make raised boot details pop.
Perfect for scrollwork, molded texture and areas you want to catch the light.
Okay... Which Shade Do I Pick?
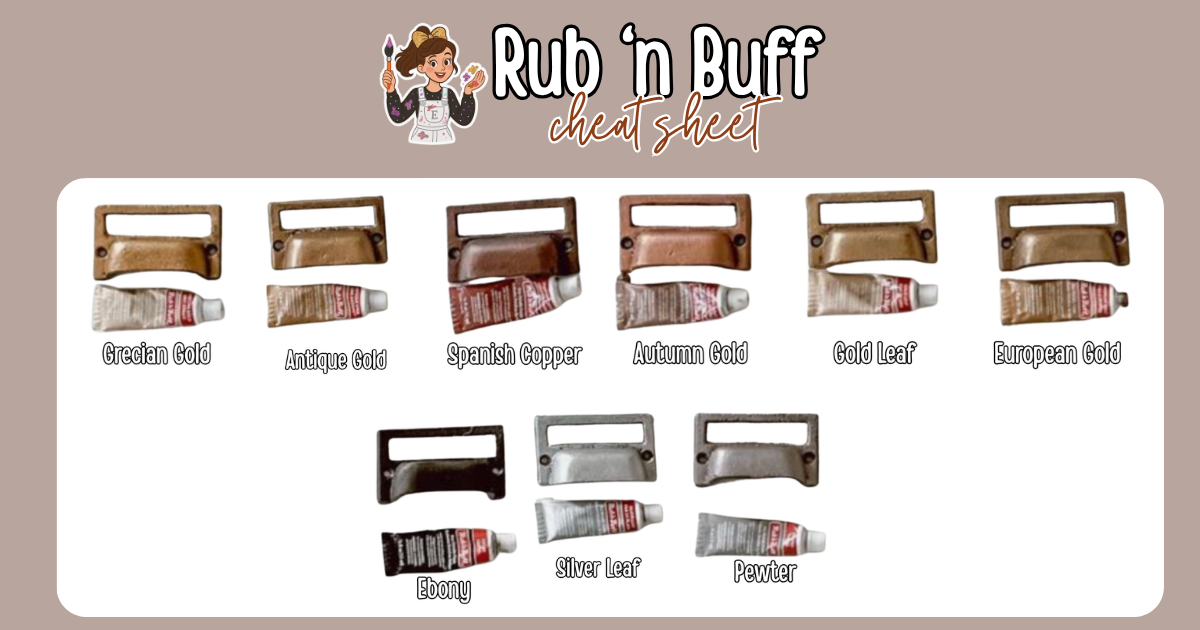
The real photographed samples above are your best visual reference. Here's the quick personality breakdown. 😂
✨ Golds
🩶 Silvers
🖤 Dark & Moody
What You'll Need
This is one of those techniques where the supply list is thankfully shorter than the explanation. 😂
Shop Everything for This Guide ✨
I've rounded up the Rub 'n Buff shades and sets, primer, fine-grit surface prep, gloves and microfiber buffing cloths in one Walmart storefront post so you can find everything in one spot.
#WalmartPartner · Affiliate link · I may earn a commission from qualifying purchases at no additional cost to you.
😩 Why Isn't My Rub 'n Buff Sticking?
If the finish seems to slide around instead of grabbing the surface, the area may be too slick.
Start with a clean, dry surface. Very lightly scuffing a compatible surface with fine-grit sandpaper can give the finish more texture to grip. The goal is to dull the slick surface—not carve new details into your nutcracker. 😂
If sanding isn't appropriate for your project, a compatible primer may be worth considering.
Basically: Rub 'n Buff and shiny, slick plastic may need a proper introduction first. 😂
Find My Surface Prep SuppliesHow to Apply Rub 'n Buff
The main rule: start with less than you think you need. No, even less than that. 😂
Start with a Tiny Amount
Use a very small amount on your fingertip, cloth or brush. A little goes a long way.
Work in Small Areas
Rub 'n Buff sets quickly, so don't coat the entire nutcracker and then plan to casually come back later. 😂 Work section by section.
Apply Lightly to Raised Details
Dab or rub the product onto the area you want to highlight. For an aged look, concentrate on raised areas and edges instead of completely covering the base color.
Buff the Finish
Use a soft microfiber cloth to buff the area. Buffing helps bring forward more of the metallic luster and shine.
Build the Finish Slowly
Want a stronger metallic effect? Add more gradually. It is much easier to build the finish than to emotionally negotiate with an entire gold-plated nutcracker afterward. 😂
Evelyn's Tip
How do I make it look aged instead of just... gold? 😂
Use less product and let the original paint color stay visible. Concentrate the metallic finish on raised edges, seams and molded details that would naturally catch light. Buff the finish, step back and look at the whole piece before adding more. The goal is dimension, not necessarily complete metallic coverage.
Do I Need to Seal Rub 'n Buff?
Not always. And this is one place where I am changing my old advice. 😂
🏠 Indoor Decorative Pieces
Once the finish has set and been buffed, you may choose to leave an indoor decorative piece alone.
A clear finish is not automatically required just because Rub 'n Buff touched the nutcracker. 😂
☀️ Outdoor or Frequently Handled Pieces
Rub 'n Buff itself is not intended as an outdoor finish. If you use it on a piece that will be displayed outside or handled frequently, a compatible water-based or acrylic sealer may help prolong the finish.
Always test first. A clear coat can affect the metallic color or sheen.
Clear Finish Options
These are clear finishes commonly used in our projects. Check the exact product directions and test over your Rub 'n Buff finish first.
#WalmartPartner · Affiliate links
Rub 'n Buff Troubleshooting
It Isn't Sticking
Make sure the area is clean and dry. A very slick surface may need a little surface preparation before the metallic finish has enough texture to grip.
I Put on Way Too Much
Work quickly with a soft cloth and buff away excess while you're still working the area. For your next section, use dramatically less product. 😂
It Looks Flat Instead of Metallic
Try buffing the finish with a soft microfiber cloth. Buffing is part of what brings forward more of the metallic luster.
🖤 Why Is My Ebony Rub 'n Buff Being Weird?
Ebony can separate in the tube and may seem thinner than some other shades. Make sure the cap is secure and gently massage the tube to help recombine the product. It may also look a little grainy during application, so work in a small area and buff the finish.
The Product in My Tube Seems Dry
Keep the tube tightly capped when you're not using it. Rub 'n Buff works in very small amounts and sets quickly, so leaving product exposed while you work through a giant project is not doing the poor little tube any favors. 😂
Accidentally Turned Your Nutcracker into King Midas? 😂
Come show us. Our nutcracker and blow mold communities are full of metallic trim, vintage finishes, paint experiments and people who will absolutely understand why you are staring at nine shades of gold trying to decide which one has the right personality.