

Every Holiday with Evelyn
The Ultimate Glitter Guide
Everything you need to choose, apply, and seal glitter—with a few laughs along the way.
First things first
Before You Start
Glitter is forgiving, but the prep underneath it still matters. A smooth, fully dry base gives the adhesive something reliable to grab and makes the finished sparkle look much more even.
Match your base paint to your glitter.
Paint the area a similar color before adding glitter. Tiny gaps become far less noticeable, and you will not have to pile on extra glitter just to hide the color underneath.
Lesson One
Choosing the Right Glitter
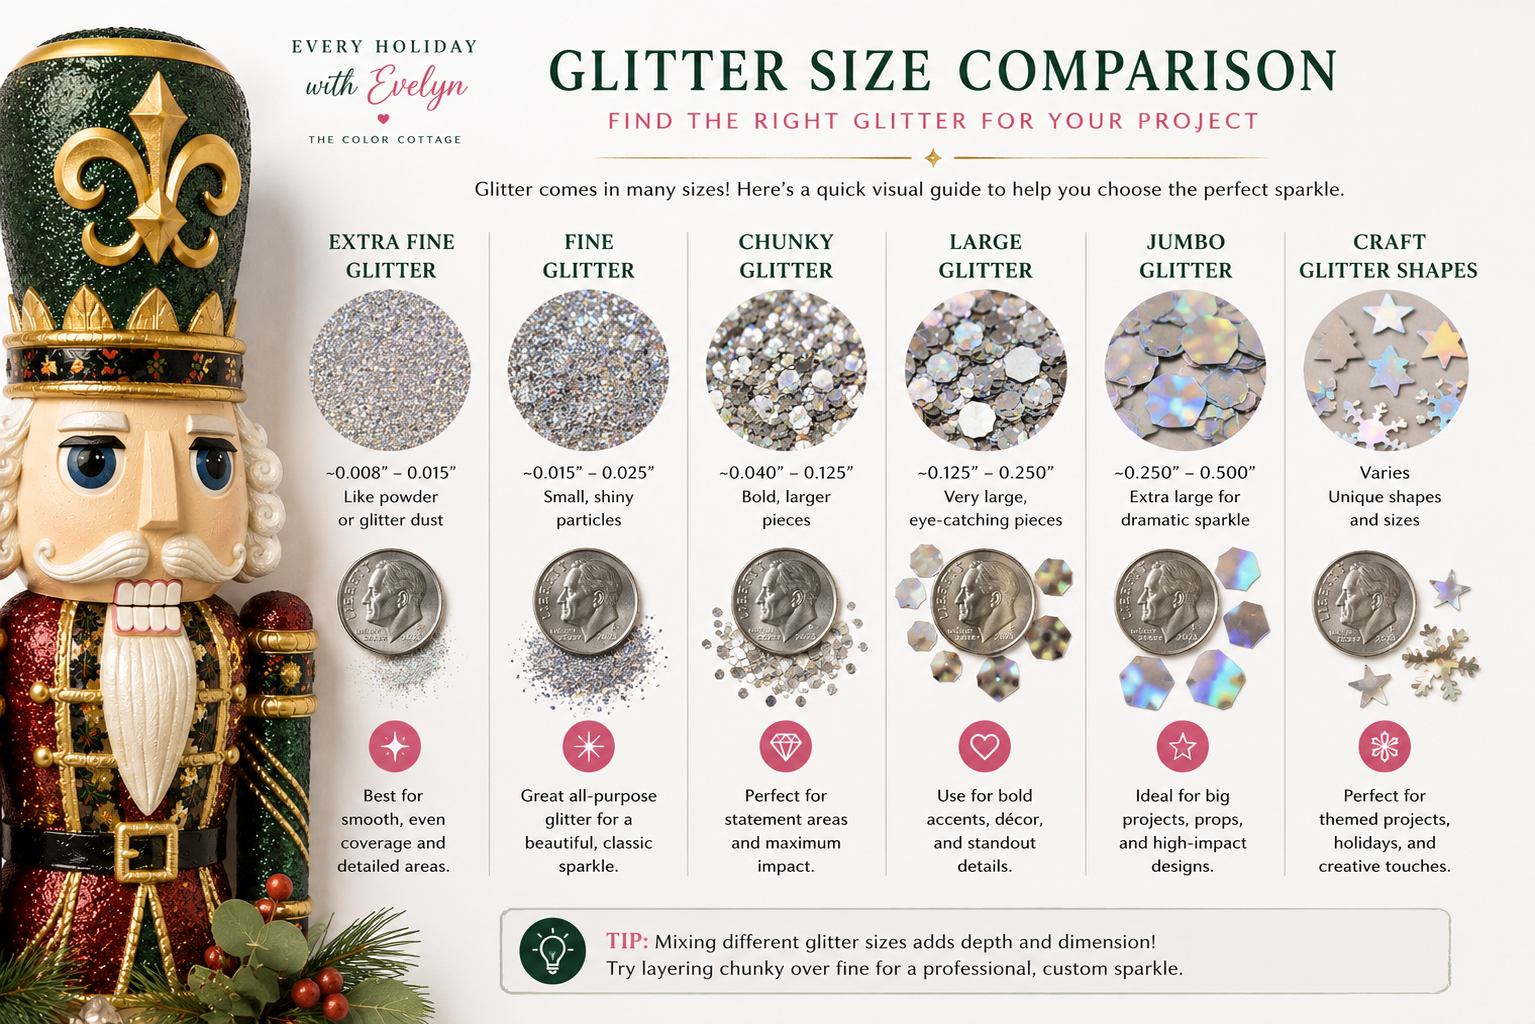
Glitter size changes both the look and the feel of your finish. The smaller the cut, the smoother and more polished it appears. The larger the cut, the more texture and drama you get.
Fine glitter is the easiest all-around choice for most nutcrackers and blow molds. It gives strong sparkle, covers well, and is still manageable when it is time to seal.
Extra-fine glitter is best for smooth finishes, lettering, faces, and small details. Chunky glitter is beautiful when you intentionally want texture, but it takes more adhesive and is harder to fully protect without changing the look.
Polyester glitter
Usually the better choice for outdoor projects because it is more resistant to heat, moisture, and fading. It still needs a compatible outdoor-safe adhesive and sealer.
Craft glitter
A perfectly good budget-friendly option for indoor décor and pieces that will not be exposed to weather. It may fade or break down faster outdoors.

Lesson Two
Applying Glitter
The goal is an even adhesive layer, generous glitter coverage, and enough drying time before you touch, brush, or seal anything.
Brush on a smooth coat of Gloss Mod Podge without leaving thick ridges or dry patches. Pour the glitter on generously while the adhesive is still fully wet, then gently tap off the excess. Do not press or rub the glitter into place.
Let the project dry completely before deciding whether it needs a second coat. Glitter often looks patchier while the adhesive is still wet. Once dry, use a clean, soft brush to remove every loose piece before sealing.

My Best Application Tips
- Use a soft, flat brush and apply the adhesive evenly.
- Work in sections small enough to finish before the Mod Podge starts drying.
- Pour more glitter than you think you need; the excess can be collected and reused.
- Let the glitter dry overnight whenever possible.
- Brush the dry surface thoroughly before adding any sealant.
The Mod Podge + water trick
Chunky glitter: Start around ¼–⅓ water to Gloss Mod Podge. Keep it thicker so it can settle into the spaces around the larger glitter pieces.
Fine or extra-fine glitter: Start around ⅓–½ water to Gloss Mod Podge. The thinner mixture flows more easily over glitter that dries flatter.
These are starting ranges, not laboratory measurements. Add water gradually. The mixture should brush smoothly without becoming runny or dripping off the project.
Reality Check 😂
Congratulations—you are now about 37% glitter.
If you are finding it on your clothes, in your hair, on your dog, or somehow inside your refrigerator, you are doing it right.

Lesson Three
Sealing Glitter Without Killing the Sparkle
Sealing helps control shedding and protects the finish, but it also coats the reflective surface of the glitter. That means every sealer changes the look at least a little.
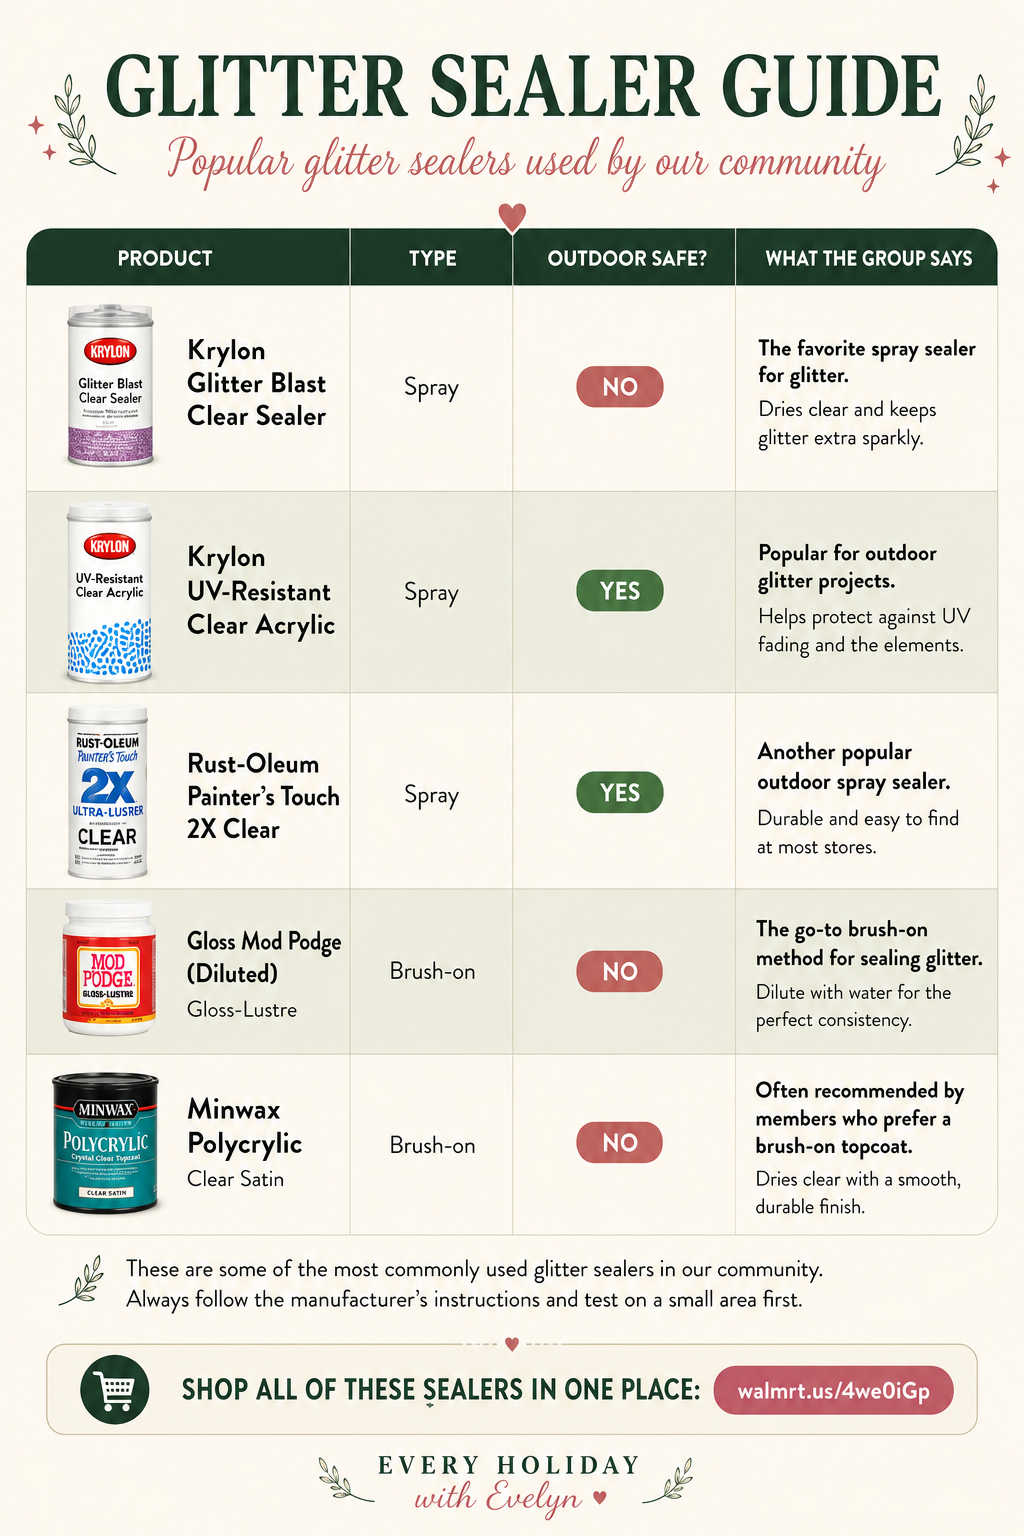
There is no perfect glitter sealer. Some products preserve sparkle better but offer less protection. Others create a stronger, smoother finish but noticeably reduce the shine. The right choice depends on where the piece will live and how much handling it will receive.
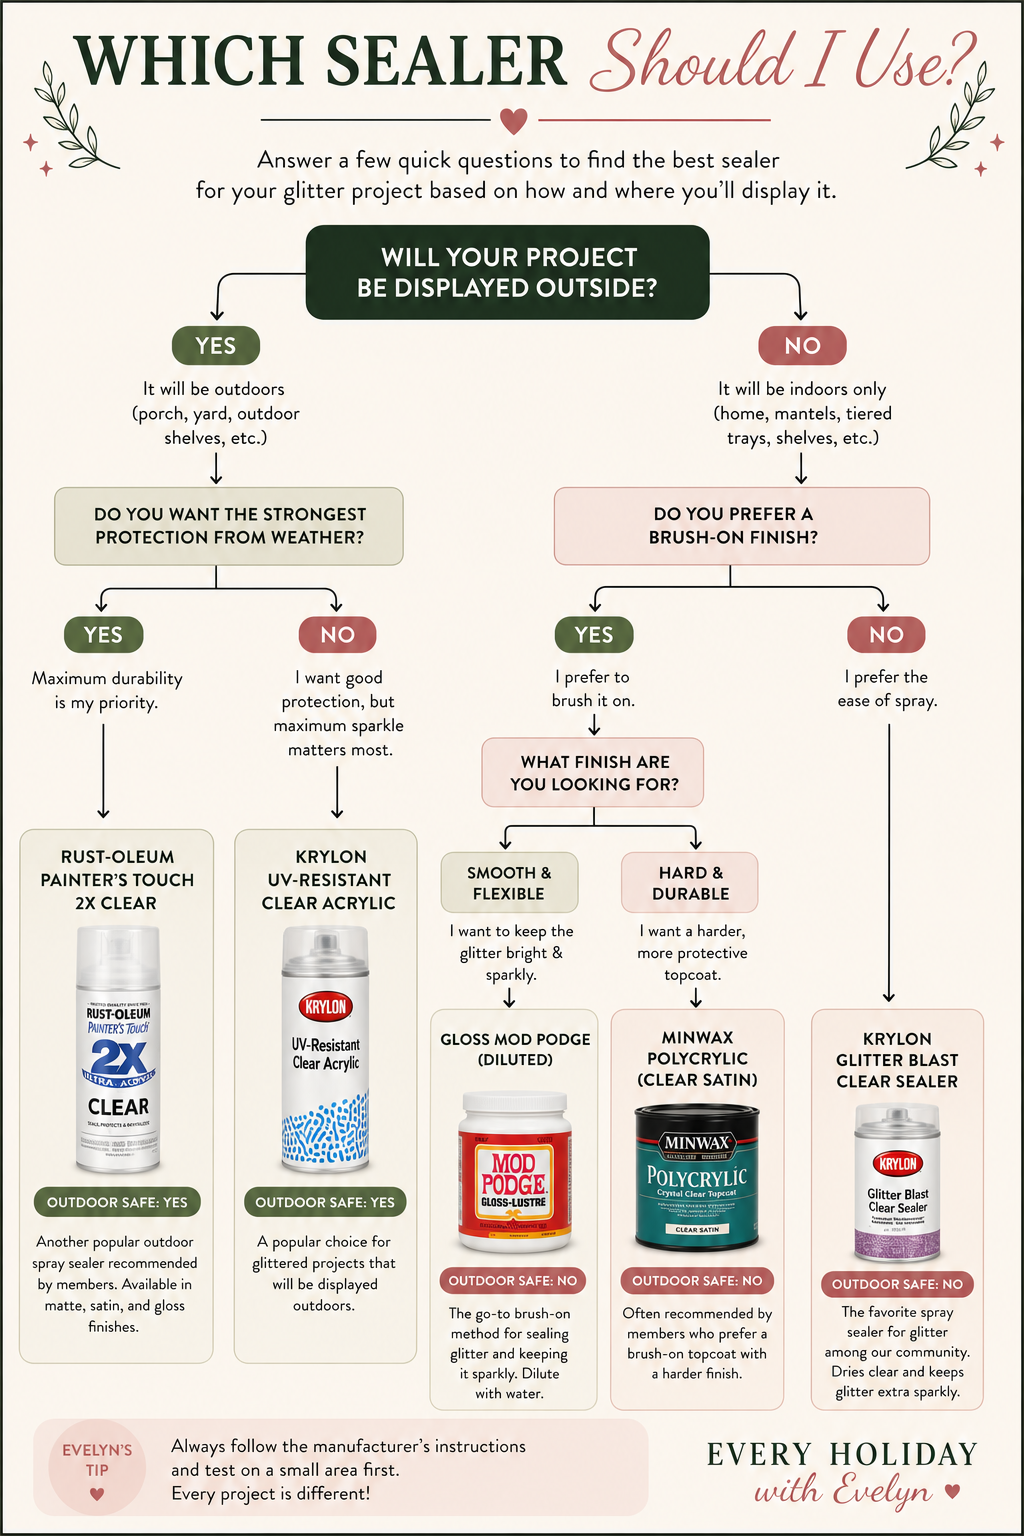
An indoor nutcracker that is displayed once a year does not need the same heavy protection as a blow mold sitting outside in sun, rain, wind, and humidity. Seal for the life your project is actually going to live.
It is simply a trade-off.
Maximum sparkle usually means accepting a little less durability. Maximum durability usually means accepting a little less sparkle. Even a clear gloss product can slightly darken the color, smooth the texture, or soften the reflective finish.
Always test the exact combination of paint, glitter, adhesive, and sealer on a hidden spot or sample board before coating the whole project.
For indoor décor
A very light gloss spray or a thin coat of glitter-specific sealer is often enough to control shedding without burying the sparkle.
For outdoor décor
Use an exterior-rated clear gloss product and expect some sparkle loss in exchange for better protection from handling and weather.
How I Seal Glitter
Let it dry completely.
Do not seal glitter that still feels cool, soft, cloudy, or tacky. Trapped moisture is one of the biggest causes of cloudy finishes.
Brush off every loose piece.
Use a clean, soft brush and be thorough. Loose glitter trapped under sealer creates bumps and uneven patches.
Test first.
Apply the sealer to a hidden area or sample. Let it dry fully before judging the sparkle and color.
Apply very light coats.
Several light passes are safer than one heavy coat. A saturated coat can pool between glitter pieces and flatten the finish.
Allow full cure time.
Dry to the touch is not the same as cured. Avoid stacking, wrapping, or placing the project outdoors until the product has fully cured.
What about Mod Podge as the final sealer?
Gloss Mod Podge can help lock glitter down, especially indoors, but brushing it directly over glitter can move the pieces, create cloudy areas, or noticeably reduce sparkle if the coat is too thick. Diluting it can make it flow more smoothly, but it still changes the finish.
For outdoor pieces, remember that regular Mod Podge is not a substitute for a true exterior-rated protective finish.
You didn’t ruin it 😂
Glitter Troubleshooting
Most glitter problems are fixable. Let everything dry completely before deciding that the project is ruined or adding another wet layer.
My glitter looks dull.
A heavy or matte sealer may be covering the reflective surface. Let it cure fully before judging it. For future coats, use a lighter gloss spray or glitter-specific sealer.
Glitter keeps falling off.
Brush away the loose glitter, touch up bare spots with adhesive and fresh glitter, let them dry, then use light and even sealer coats.
My Mod Podge dried cloudy.
The layer may be too thick, still damp underneath, or curing in high humidity. Give it more time and do not immediately cover it with another wet coat.
The surface feels rough.
Chunky glitter will always have texture. For fine glitter, brush the dry surface thoroughly and add only a controlled topcoat if a smoother feel is truly necessary.
Shop the guide
Shop Everything Mentioned in This Guide
I linked the glitter sealers and supplies mentioned above in one place so you do not have to hunt them down individually.
Some links may be affiliate links, which means I may earn a small commission at no additional cost to you.
Quick answers
Frequently Asked Questions
Do I have to seal glitter?
Which glitter should I buy?
Can I use glitter outdoors?
Why does my glitter sparkle less after sealing?
Need more holiday DIY help?
Come join the fun.
Get project inspiration, product finds, troubleshooting help, and advice from holiday decorators who understand why “just one more nutcracker” is a perfectly reasonable sentence.
Find My GroupsP.S. If you do not find glitter somewhere completely unrelated next week… did you even glitter? ✨